

Quick Answer
The smartest way to customize a BMX build is to start with high-impact, low-risk parts grips, axle nuts, and pegs - then work outward to hubs, sprockets, and stems once axle size, frame geometry, and brake compatibility are confirmed.
Customizing a BMX build is rewarding when done in the right order. The parts that look the most impressive are rarely the ones that improve performance most and the parts that transform how the bike rides are usually the ones that cost the least to get right.
Customizing a BMX bike is one of the most satisfying parts of riding - and one of the easiest ways to spend money on parts that do not fit, do not work together, or do not actually improve anything about the riding experience. The gap between a build that looks custom and a build that rides custom is wider than most riders expect, and it almost always comes down to order of operations rather than budget.
This guide walks through the entire customization process in the right sequence - starting with the parts that deliver the most immediate return and building outward to the changes that require more planning, more compatibility checking, and a clearer sense of what the build actually needs to do.
Why Customization Order Matters More Than Most Riders Think
Most BMX riders approach customization the same way - they see a part they like, buy it, and figure out compatibility afterward. This approach works occasionally by luck and fails regularly in ways that are expensive and frustrating. A stem that does not fit the handlebar diameter. Pegs that do not thread onto the axle. A sprocket that works with the chain length but not the chainline. A hub that is the right size but the wrong driver configuration for the existing chain.
Every one of these problems is avoidable with a ten-minute compatibility check before purchasing. Building a personalized bmxs setup is a sequenced process - each layer of customization depends on the decisions made before it. Understanding that sequence is what separates builds that come together smoothly from builds that generate a growing pile of returned parts.
Layer 1 - Start With the Contact Points
The three contact points between rider and bike are the handlebars, pedals, and seat. Of these, grips are the highest-impact, lowest-risk customization available on any BMX build. They require no compatibility research, fit every standard 22.2mm handlebar, install in minutes, and immediately change how the bike feels in every single session.
Choosing grips for a custom build involves three decisions: compound (soft for park and flatland, firmer for street durability), texture pattern (diamond, waffle, or smooth depending on riding style and personal preference), and color to match the overall build theme. Billet BMX's Diamond Series grips are a strong starting point - the high-performance rubber compound delivers the kind of tactile response that makes a build feel intentional rather than stock, and they are available in colorways that complement both dark and light frame finishes.
Pedals are the second contact point worth customizing early. Platform pedal size, pin configuration, and material all affect how the foot sits on the pedal during riding - and a custom pedal that improves grip and feel makes a measurable difference in trick confidence and session comfort. Like grips, pedals fit all standard BMX crank arms and require no compatibility research before purchasing.
Layer 2 - Hardware and Axle Components
Axle nuts are the most underrated customization on a BMX bike. Stock axle nuts are almost always generic steel hardware that rounds off quickly, lacks visual identity, and provides no indication of the torque applied during installation. CNC machined 12-point axle nuts in anodized aluminum - available from Billet BMX in multiple colors - address all three of those problems simultaneously.
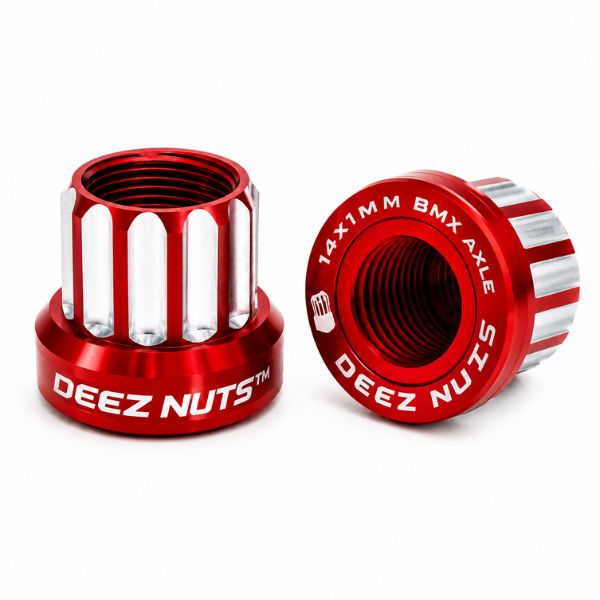
The critical compatibility check at this layer is axle size. BMX frames use either 14mm or 3/8 inch rear axles, and these standards are not interchangeable. Measuring the rear axle before ordering any axle-dependent component - nuts, pegs, chain tensioners, or certain hub spacers - takes sixty seconds and prevents the most common return in the custom parts category.
Chain tensioners are another hardware customization that delivers both functional and visual value. A quality anodized tensioner keeps chain tension consistent across sessions, eliminates the need for constant readjustment, and adds a finished look to the rear dropout area that stock hardware never achieves.
Layer 3 - Pegs and Grinding Hardware
Pegs are where BMX customization gets visual. A set of well-chosen pegs on a matching hub and axle nut setup transforms the look of the rear wheel into something that reads as intentionally built rather than assembled from whatever came in the box.
The functional decisions at this layer involve material and length. Aluminum pegs are lighter and come in color options that enable full-build coordination. Steel pegs grind more consistently and last longer under heavy street use but add weight and are available in fewer color options. Length runs from 3 inches for technical riders who need the peg to clear obstacles quickly, to 4.5 inches for beginners and riders who want maximum grind surface for consistency.
Compatibility at this layer involves axle size (already confirmed in Layer 2) and peg thread pitch. Most modern BMX pegs use standard thread specifications that fit all current frames, but older frames occasionally use different pitch standards - worth confirming once before ordering rather than assuming universal fit.
Layer 4 - Wheels, Hubs, and Sprockets
This is where customization becomes genuinely complex - and where compatibility research pays the most significant dividends. A rear hub choice affects axle size, driver tooth count, brake compatibility, and overall wheel build. Getting one of those factors wrong means a hub that does not work with the existing chain, frame, or brake system.
The hub driver tooth count determines chainline compatibility with the sprocket. Most modern BMX setups run a 9 tooth driver with a 25 tooth sprocket and a 1/8 inch chain - a combination that is widely available and easy to source. Changing any one element of that combination requires confirming the others still work together before purchasing.
Sprocket customization offers one of the clearest visual customization opportunities on the drivetrain. CNC machined aluminum sprockets in anodized finishes are available in multiple tooth counts and colorways, and a sprocket that coordinates with the hub and chain tensioner pulls the entire drivetrain aesthetic together in a way that generic steel sprockets cannot replicate.
Billet BMX lists driver compatibility information on every hub product in its catalog - making it straightforward to confirm that a chosen hub works with the existing chain and sprocket before the order is placed rather than after it arrives.
Layer 5 - Stems, Bars, and Cockpit Components
The cockpit is the last layer of customization because it involves the most rider-specific geometry decisions. Stem rise, reach, and clamp diameter all affect how the bars sit relative to the rider's body, and a stem that works perfectly for one rider's proportions and riding style may feel completely wrong for another rider on the same frame.
Before ordering any stem or handlebar combination, confirming the existing clamp diameter (most modern BMX bikes use 22.2mm or 1 inch clamp) and the handlebar outer diameter prevents the most common cockpit compatibility mistake. Most BMX builds use standard 22.2mm bars with matching stem clamps, but some older and specialty frames use different standards.
Color coordination at this layer brings the entire build together - a stem in an anodized color that picks up the axle nut and peg finish creates a visual thread through the build that reads as a considered, personalized setup rather than a random collection of upgraded parts.
The Compatibility Checklist Every Custom Build Needs
Before any custom BMX parts order is placed, confirming five things eliminates the vast majority of fitment problems:
Axle size - 14mm or 3/8 inch on both front and rear. Brake compatibility - pad brake or disc brake for any wheel or hub purchase. Driver tooth count - 9 tooth or 10 tooth for hub and chain combination. Clamp diameter - 22.2mm or 1 inch for stems and handlebars. Seat post diameter - 25.4mm or 27.2mm for seat clamp and post purchases.
Every product at Billet BMX lists these compatibility specifications clearly - which means the confirmation process takes minutes rather than requiring research across multiple sources before every purchase.
The Bottom Line
Building a personalized BMX setup is a process that rewards patience, sequencing, and five minutes of compatibility research before every purchase. The riders who end up with builds that genuinely perform and look intentional are not the ones who spent the most - they are the ones who upgraded in the right order, confirmed compatibility before buying, and chose parts that served both the riding style and the visual identity of the build simultaneously. Billet BMX carries custom BMX parts across every layer of the build process - from grips and axle nuts to hubs, sprockets, and cockpit components - with compatibility specifications clearly listed so every purchase fits the first time.
Frequently Asked Questions
Q1: What custom BMX parts make the biggest difference to riding performance?
Grips, sealed bearing hubs, and CNC axle nuts make the biggest difference. Each one directly improves traction, rolling smoothness, and drivetrain reliability across every session at every skill level.
Q2: How do I know which custom BMX parts are compatible with my frame?
Check axle size (14mm or 3/8 inch), brake type, driver tooth count, and clamp diameter first. Billet BMX lists all compatibility specs clearly on every product page.
Q3: Can custom BMX parts void a frame warranty?
No - aftermarket parts rarely void frame warranties unless they cause direct structural damage. Correct torque during installation and buying from trusted sources like Billet BMX prevents warranty-voiding damage entirely.
Q4: What is the best order to customize a BMX build?
Start with grips and pedals, then axle nuts, then pegs, then hubs and sprockets, then cockpit components last. Confirming compatibility at each layer prevents fitment problems before they occur.
Q5: How much does a fully customized BMX build cost beyond the base bike?
Expect $80 to $200 for a meaningful custom build covering grips, axle nuts, pegs, a hub, and sprocket. Starting with highest-impact parts first spreads cost without sacrificing riding experience.


